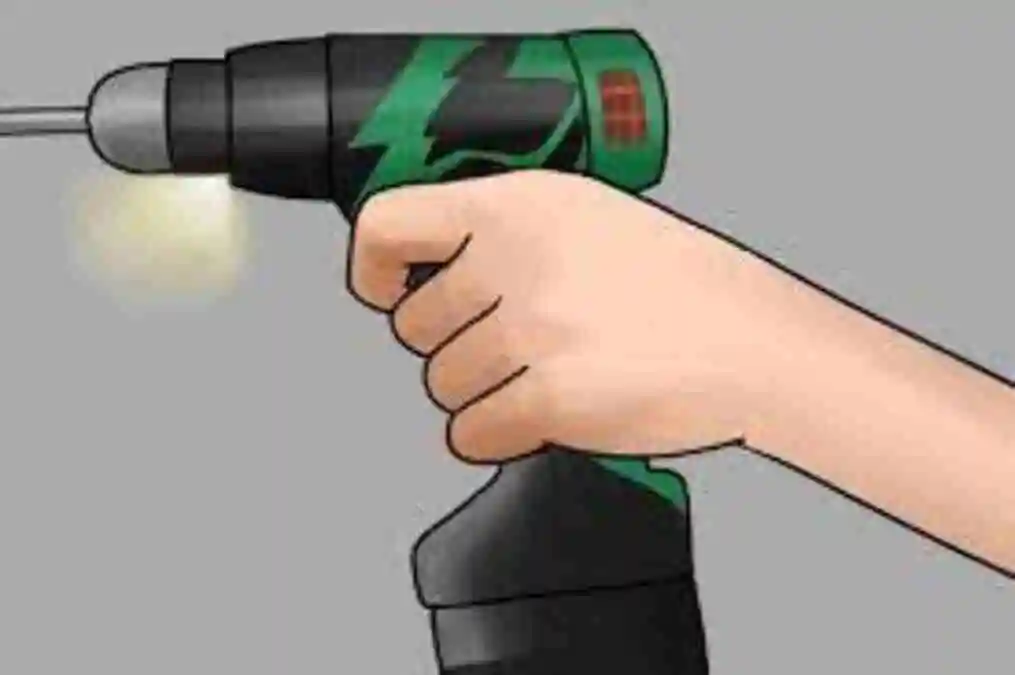
Discovering that your trusty hammer drill’s light is on but not working can be confusing. It’s like having a puzzle in your hands with missing pieces – there’s a clear signal, but the drill won’t cooperate. In this easy-to-follow guide, we’ll unravel the mystery behind hammer drill light comes on but not working.
We’ll explore common issues and provide straightforward solutions to revive the vigor of your seemingly dormant tool. Let’s dive in and make your hammer drill work again with simple steps and clear explanations.
Hammer Drill Light Comes ON but Not Working
Faulty Motor
Symptoms: Unusual noises like grinding or whirring during operation.
A malfunctioning motor is a common suspect when your drill remains eerily silent despite the illuminated light. Over time, motors can wear out, leading to disengagement. To confirm this, listen closely for any unusual sounds during operation.
If you hear grinding or whirring, it’s a telltale sign of motor troubles. In such cases, replacing the motor may be your best course of action.
Investigating Loose Connections
Symptoms: Insufficient power, potential flickering light.
Power inadequacy due to loose connections can be another root cause. Initiate your troubleshooting by testing the battery. Swap it out with a fully charged one to eliminate potential power-related issues.
If the problem persists, recharge the original battery, ensuring it reaches its full capacity. Thoroughly inspect the battery and connections for any signs of looseness that may hinder the power flow.
Unraveling the Trigger Switch Mystery
Symptoms: Intermittent connection leading to non-operation.
A faulty trigger switch could be the culprit behind the illuminated light and a non-functional drill. Examine the trigger switch for visible damage or wear.
If any issues are detected, it’s advisable to replace the trigger switch. Ensuring the trigger switch’s optimal functionality is crucial for the drill to respond accurately to your commands.
Decoding Overload Protection
Symptoms: Flashing battery lights.
If the battery lights are flashing, your drill might be safeguarding itself through overload protection. This typically occurs when you squeeze the trigger too hard.
To remedy this, release the trigger and allow the drill to cool down. Only resume use once the tool has reached an optimal temperature to prevent potential damage.
Delving into Other Potential Issues
Symptoms: Carbon brush or wire wear.
Beyond the commonly encountered problems, there might be other issues at play, such as worn-out carbon brushes or damaged wires. Employing a multimeter can aid in diagnosing these intricate problems.
However, if you find yourself uncertain or uncomfortable with the diagnosis, seeking professional assistance is a wise decision to ensure a comprehensive examination and repair.
Practical Troubleshooting Steps:
Now that we’ve explored the potential causes, let’s delve into practical steps you can take to troubleshoot and address these problems.
1. Battery Testing:
● Swap out the battery with a fully charged one to eliminate power-related issues.
● Recharge the original battery and ensure it reaches its full capacity.
2. Broken Rotor
● If you dropped drill multiple times, you might see broken rotor
● You will see light coming but drill is dead, inspect rotor and if broken change it
3. Trigger Switch Examination:
● Check the trigger switch for any visible damage or wear.
● Replace the trigger switch if it is found to be faulty or intermittently connected.
4. Overload Protection Reset:
● If the battery lights are flashing, release the trigger and allow the drill to cool down.
● Resume use only after the tool has cooled to prevent further issues.
5. Multimeter Diagnosis:
● Use a multimeter to test for issues like worn-out carbon brushes or damaged wires.
● Seek professional help for a thorough diagnosis if needed.
Conclusion:
Addressing a hammer drill with an illuminated light but no functionality involves a systematic approach to identify and resolve the underlying issues.
By following the troubleshooting steps outlined in this guide, you can efficiently diagnose the problem and potentially fix it yourself. However, if uncertainties persist, don’t hesitate to consult with a professional for a comprehensive examination and repair.
Remember, a well-maintained and properly functioning hammer drill ensures smooth operations and enhances your overall DIY experience.